
How to design a WiFi LED Matrix Stock Ticker
LEE BTF-LIGHTING
The idea supported by customer Alan Zhao
Intro
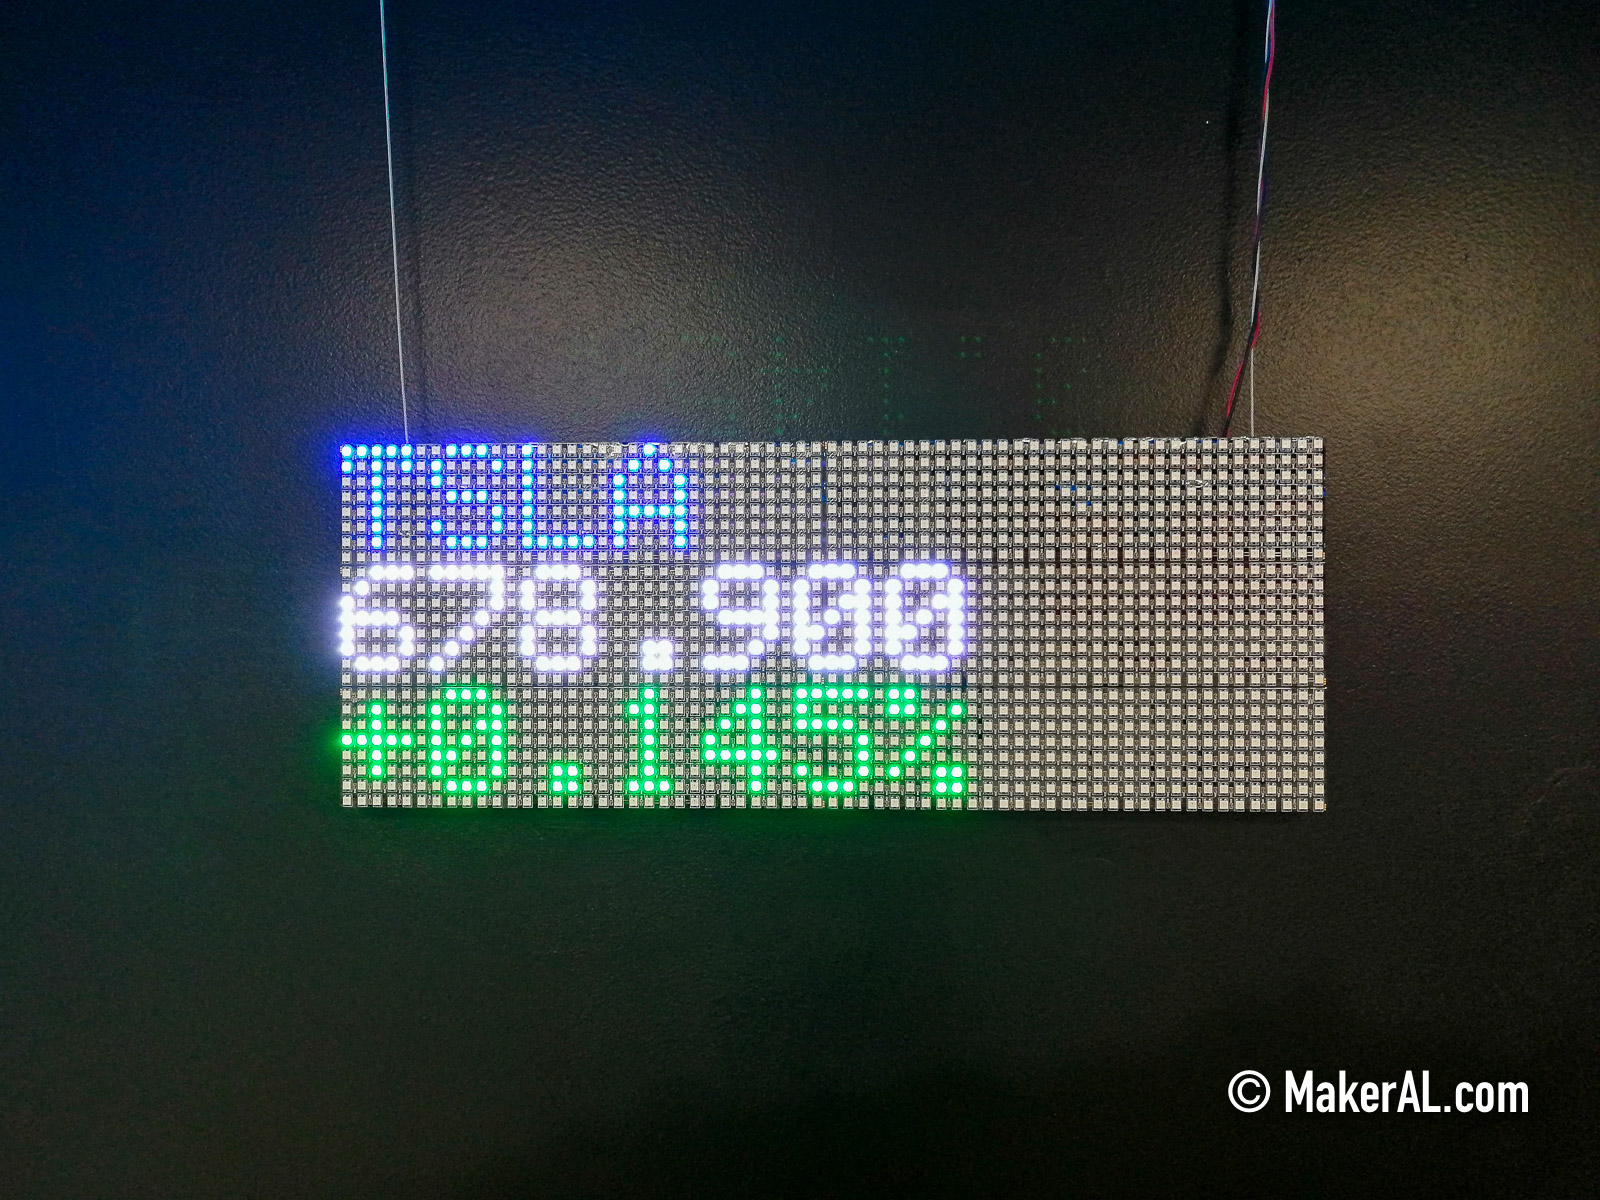
We will be making a stock ticker that can display real time prices of stocks, cryptocurrencies, ETF, and indices.
This stock sticker consists of six 8x32 LED matrices tiled in 2 columns x 3 rows pattern. The LED matrices then will be mounted on a 3D printed frame. Twelve Data's free Basic plan is required to get real time stock prices over REST API. Wemos D1 mini is used as controller.

Parts
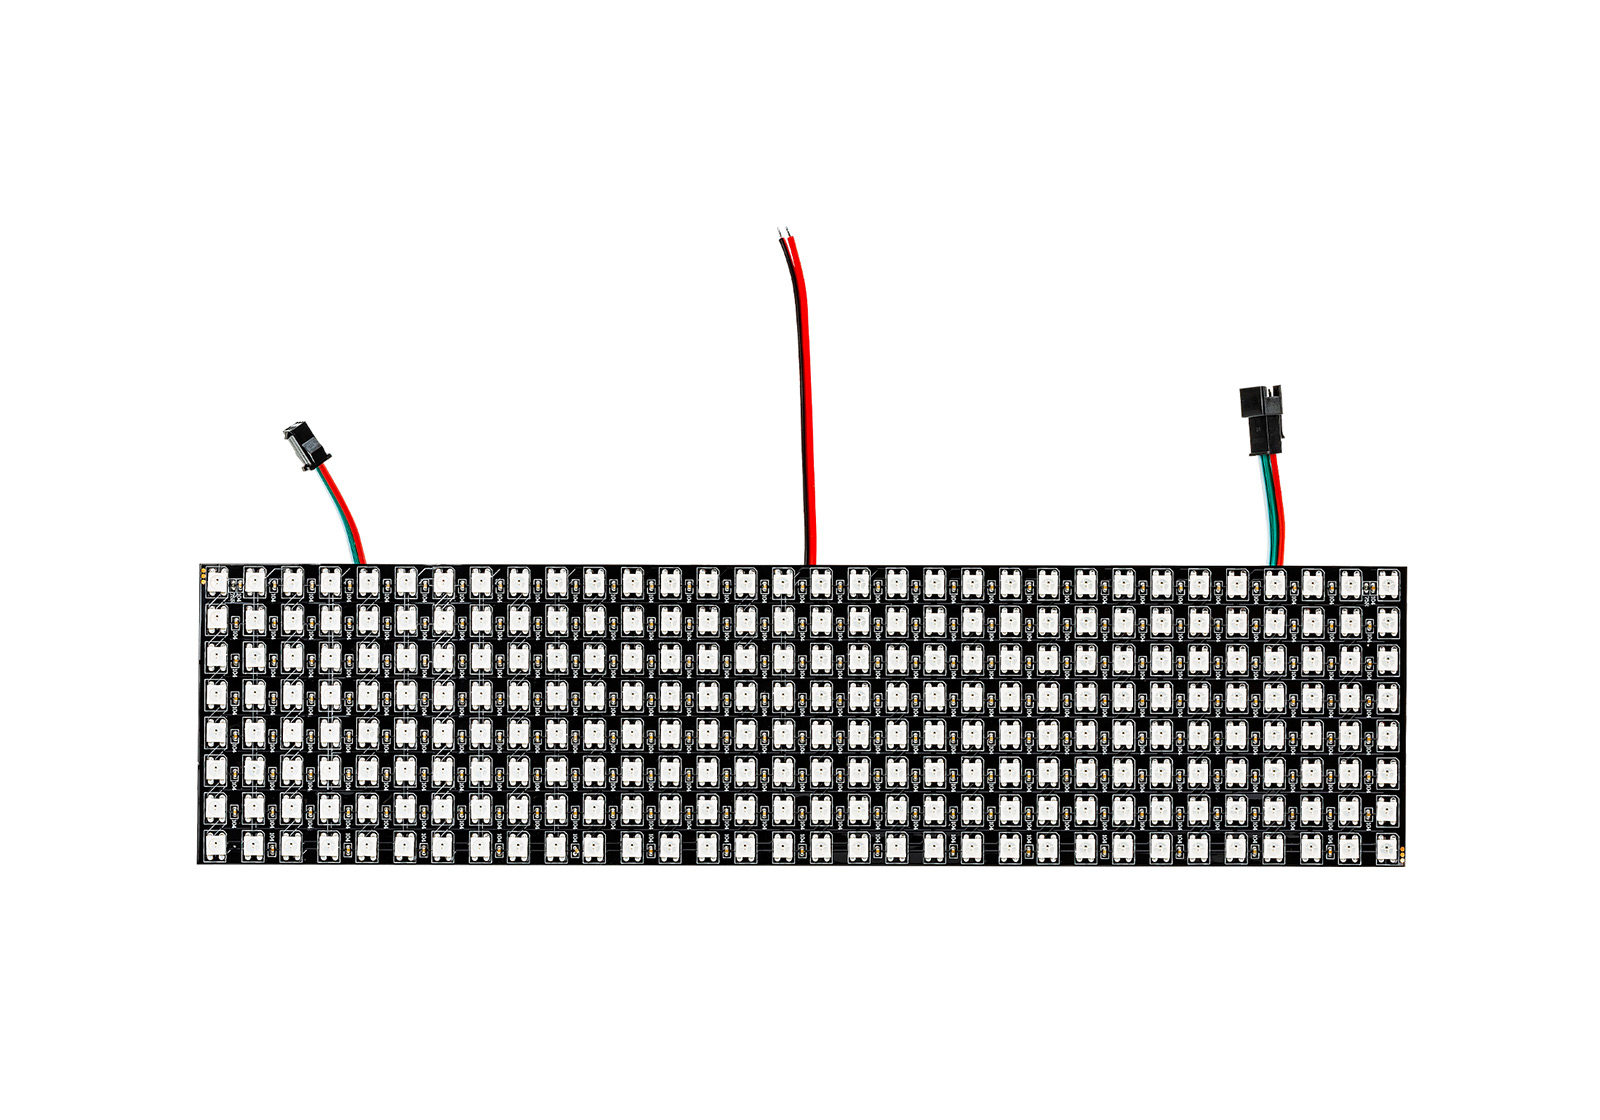
- Six of 32 x 8 LED matrix or 32 x 8 LED matrix - Eco version, slightly cheaper
- WeMos D1 Mini
- Small Prototyping PCB board
- Terminal blocks
- Heavy duty double-sided tape
- Mean Well 200W 5v 50 Amps Power Supply
- 18 gauge wires
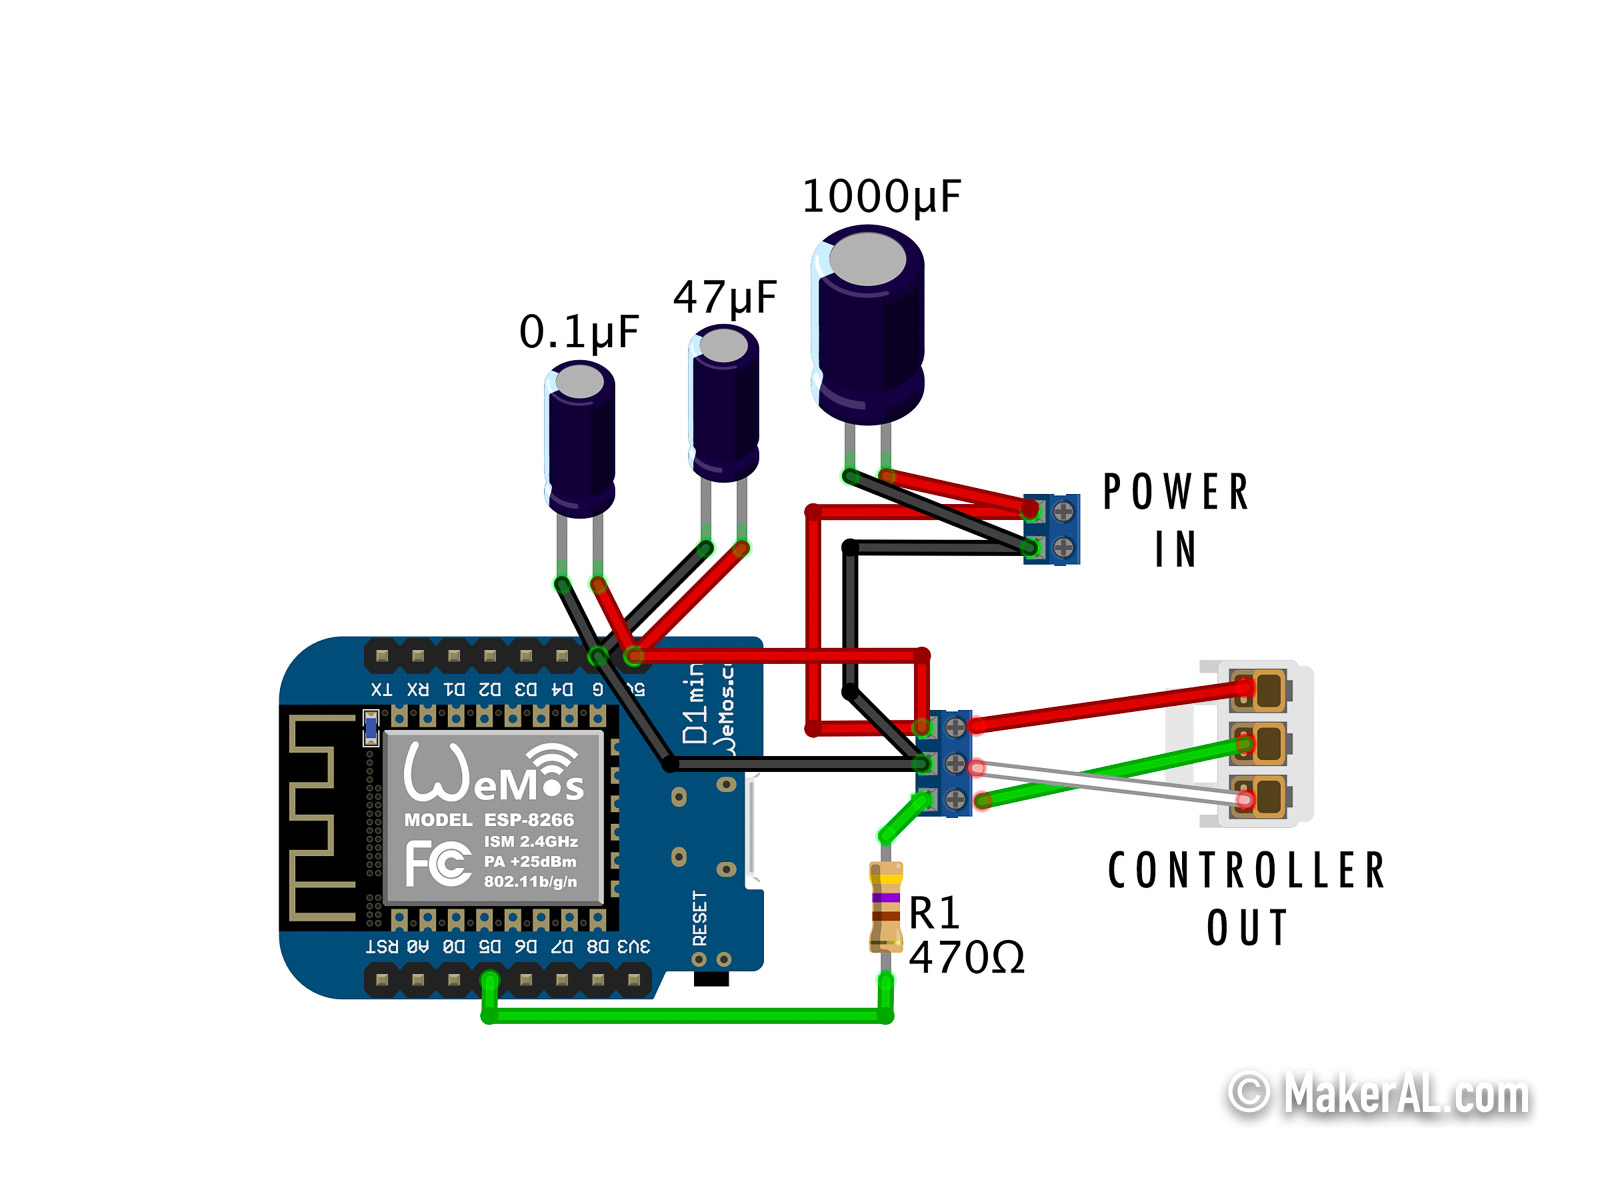
- 0.1 µF, 47 µF, and 1000 µF capacitors
- 1000 µF capacitor prevents initial onrush current from damaging the LEDs
- 0.1 µF and 47 µF are the bypass capacitors that filter out noise in DC signal
- 470 ohm resistor
- 470 ohm resistor prevents current spike from damaging the first LED pixel
- M3 screws (16mm or longer), nuts and washers
Power Usage
Each LED consumes about 20 mA and 0.1 watt of power per color. For all 3 colors (RGB), a LED consumes about 60 mA and 0.3 watt when on full power (in white on 100% brightness). We have total of 1,536 LEDs (256 per matrix x 6), therefore, the total power consumption is 92160 mA or 92 Amps (1,536 LEDs x 60 mA per LED) and 460 watt (1,536 LEDs x 0.3 watt per LED) when on full power.
As you can tell, our 200 watt and 50 Amps power supply will be insufficient for full power consumption. The manufacturer states that the LED matrix PCB is not designed to withstand the heat it generates when on full power, AKA this is not a device used for lighting. Therefore, you should NEVER use it under full power. We can reduce the power consumption by reducing the LED brightness and the number of lit LED at one time.
Mounting Frame
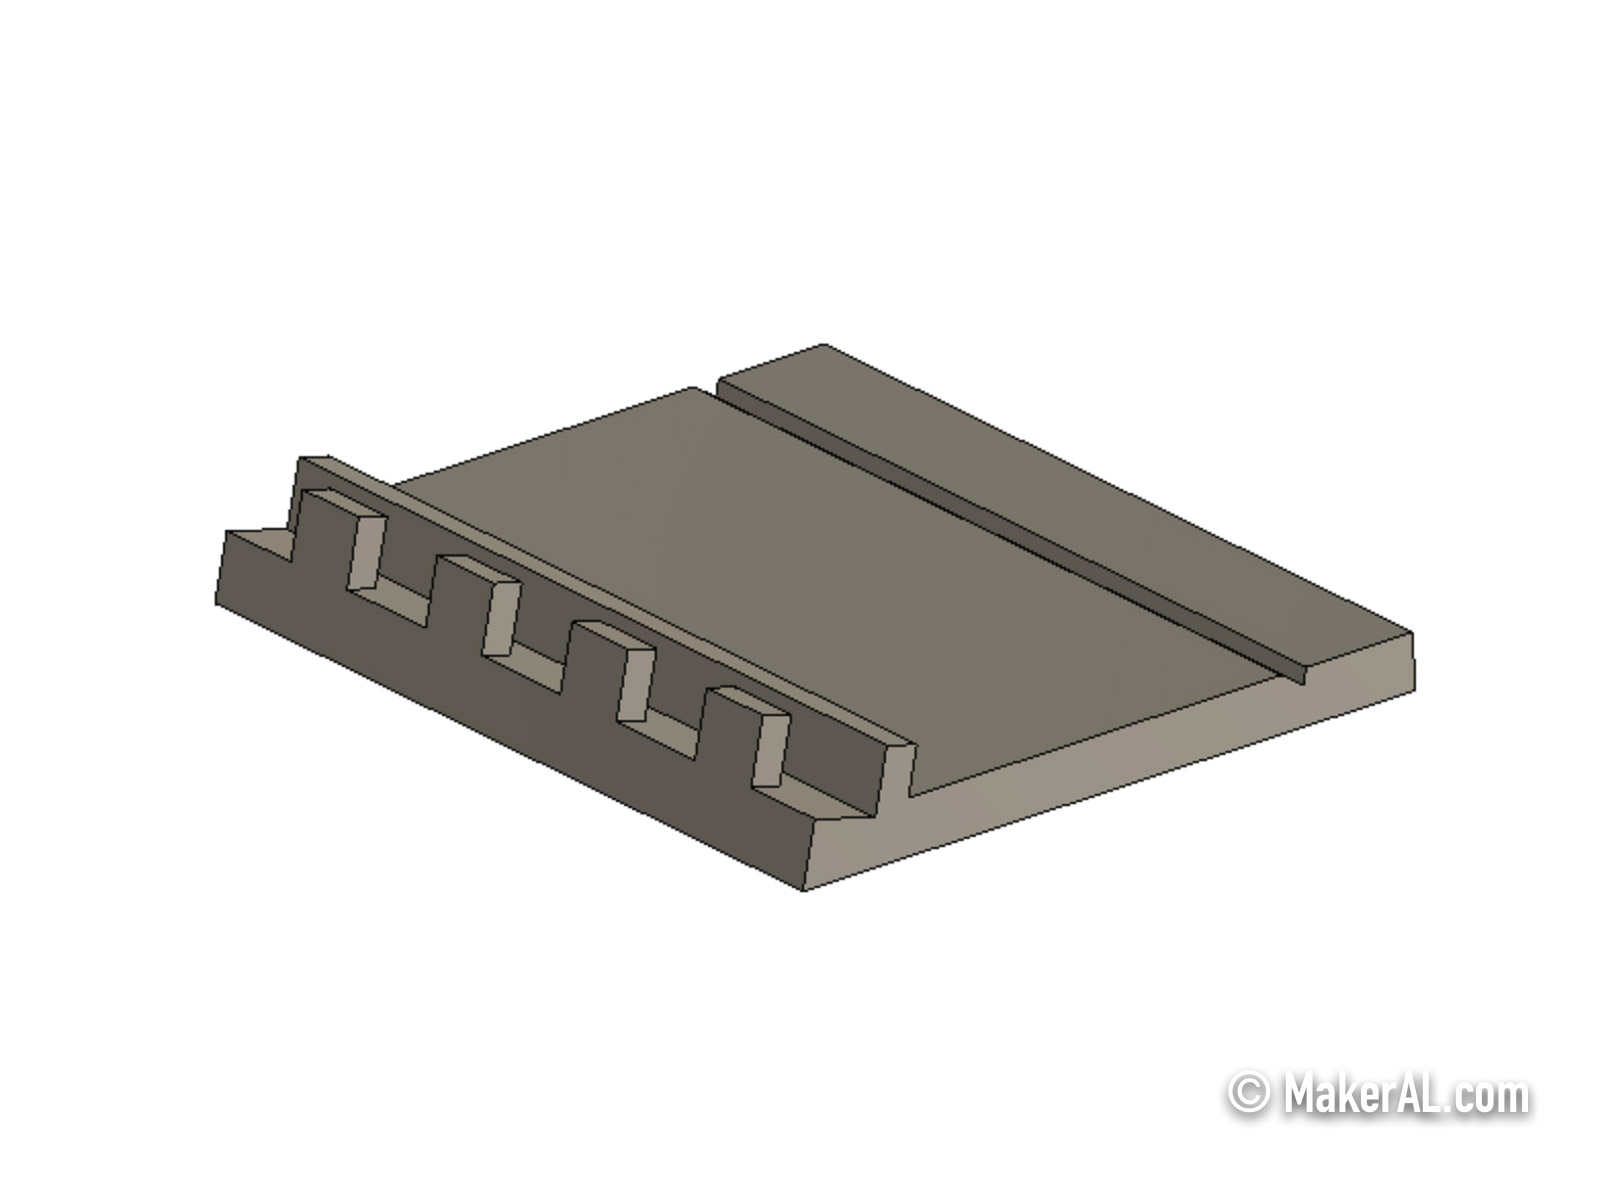
The LED matrix is made out of flexible material, to interconnect all 6 matrices, a frame is required for support. I designed and 3D printed six brackets to be interconnected as frame. I added passthrough channels to the bracket so that wires can be trapped and routed cleanly within. Two brackets are needed to mount a LED matrix; 12 brackets are needed in total. The brackets then will be screwed together with a few M3 screws, nuts, and washers. Screw plugs are also required for screwing brackets together. Screw plug allows you to connect brackets in both row and column orientations. STL files are provided below. Support is not required to print them.
Once you have everything mounted, you should have something look like below.

Controller
WeMos D1 mini is used as controller. D5 pin is used for data. See wiring diagram below.

Assembly
IMPORTANT: Test every LED matrix for defects
Test every LED matrix for defects, it's easier to replace the defect ones now than after they're mounted. You want to make sure there are no dead pixels, and all colors are light up correctly.
Install
Select the correct board under menu
To test the colors, upload the code below to the controller and attach each LED matrix to test. Uncomment each line of
| /** * 32x8 LED matrix quality test * * by MakerAL.com 2021. */ // // Pins // // D5 pin // LED board configurations // // Instantiated matrix // https://learn.adafruit.com/adafruit-neopixel-uberguide/neomatrix-library // Adafruit_NeoMatrix matrix = Adafruit_NeoMatrix( LED_BOARD_WIDTH, LED_BOARD_HEIGHT, LED_PIN, NEO_MATRIX_TOP + NEO_MATRIX_LEFT + NEO_MATRIX_ROWS + NEO_MATRIX_ZIGZAG, NEO_GRB); // Colors struct RGB { byte r; byte g; byte b; }; // Define some colors we'll use frequently RGB off = { 0, 0, 0 }; RGB white = { 255, 255, 255 }; RGB red = { 255, 0, 0 }; RGB yellow = {255, 255, 0}; RGB blue = {0 , 0, 255}; RGB green = {0, 255, 0}; RGB teal = {0, 255, 255}; RGB purple = {255, 0, 255}; RGB pink = { 255, 74, 150 }; void setup() { matrix.begin(); matrix.setBrightness(30); matrix.setTextWrap(false); } void loop() { // Clear screen, display nothing //matrix.fillScreen(matrix.Color(off.r, off.g, off.b)); matrix.fillScreen(matrix.Color(red.r, red.g, red.b)); //matrix.fillScreen(matrix.Color(green.r, green.g, green.b)); //matrix.fillScreen(matrix.Color(blue.r, blue.g, blue.b)); //matrix.fillScreen(matrix.Color(white.r, white.g, white.b)); matrix.show(); delay(5000); } |
LED Matrices
LED matrices are tiled together. There are different ways to tile them. Below is how I laid out the six LED matrices, I found wiring is simpler and shorter with this configuration. You can read more on Neomarix Library.
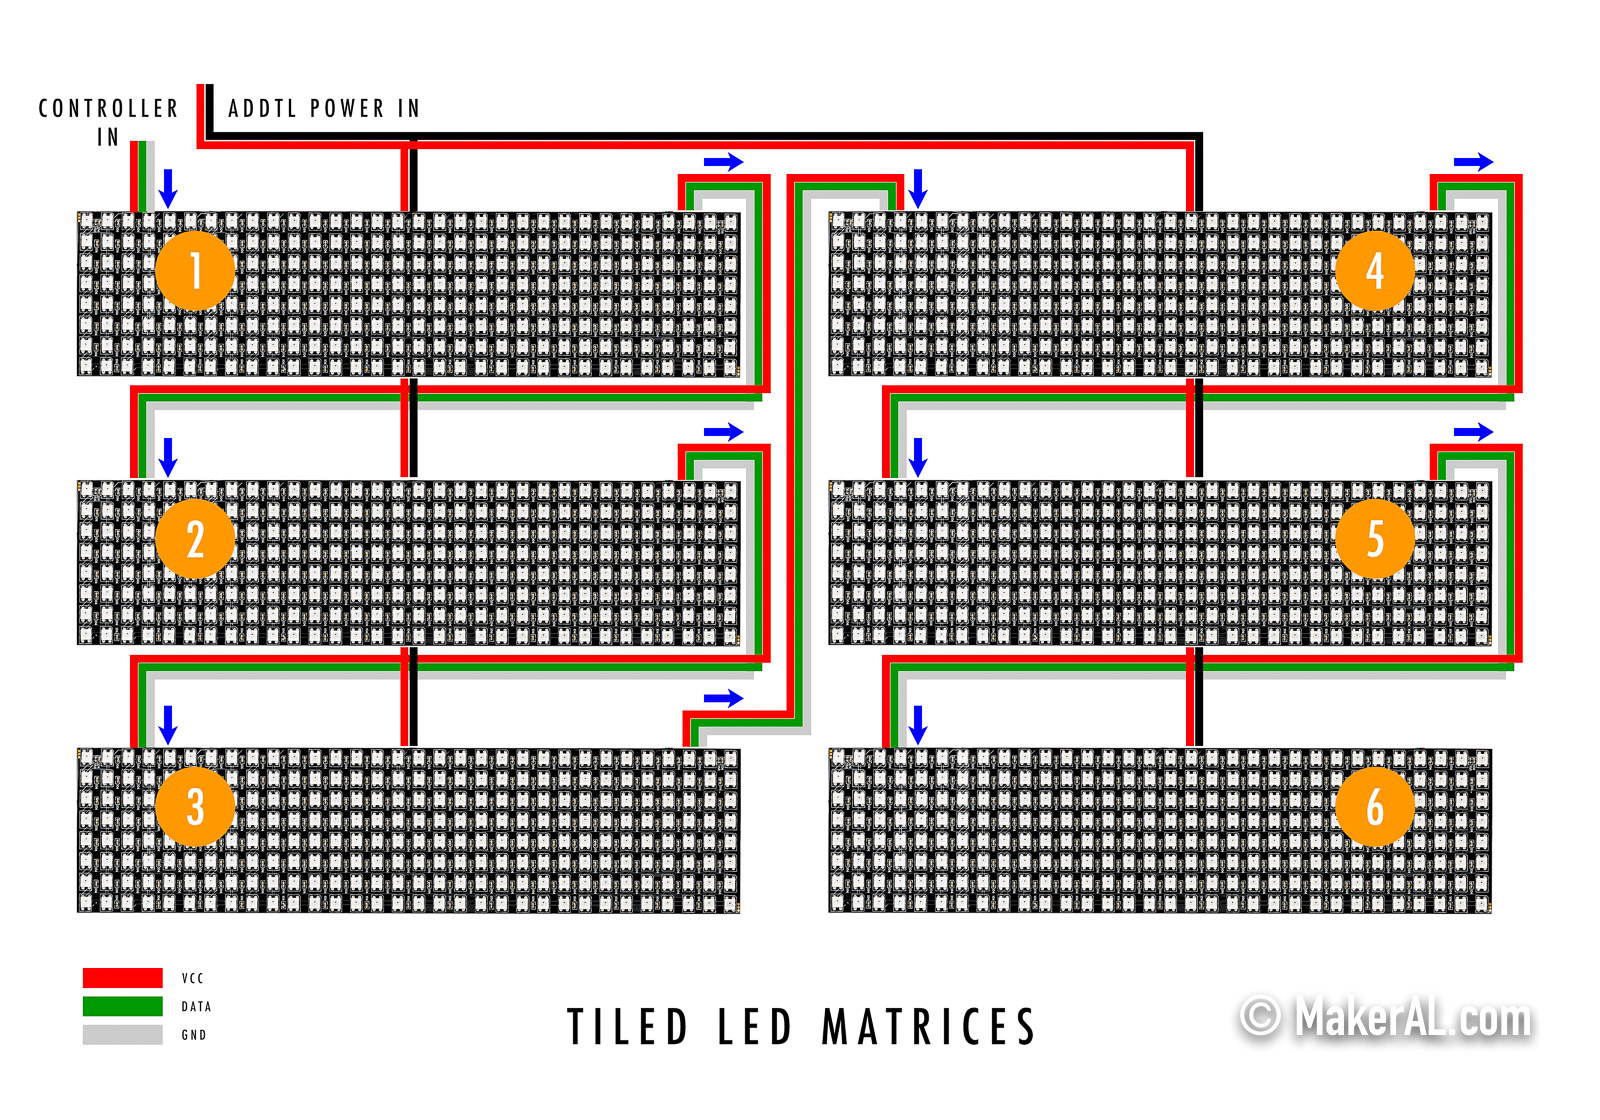
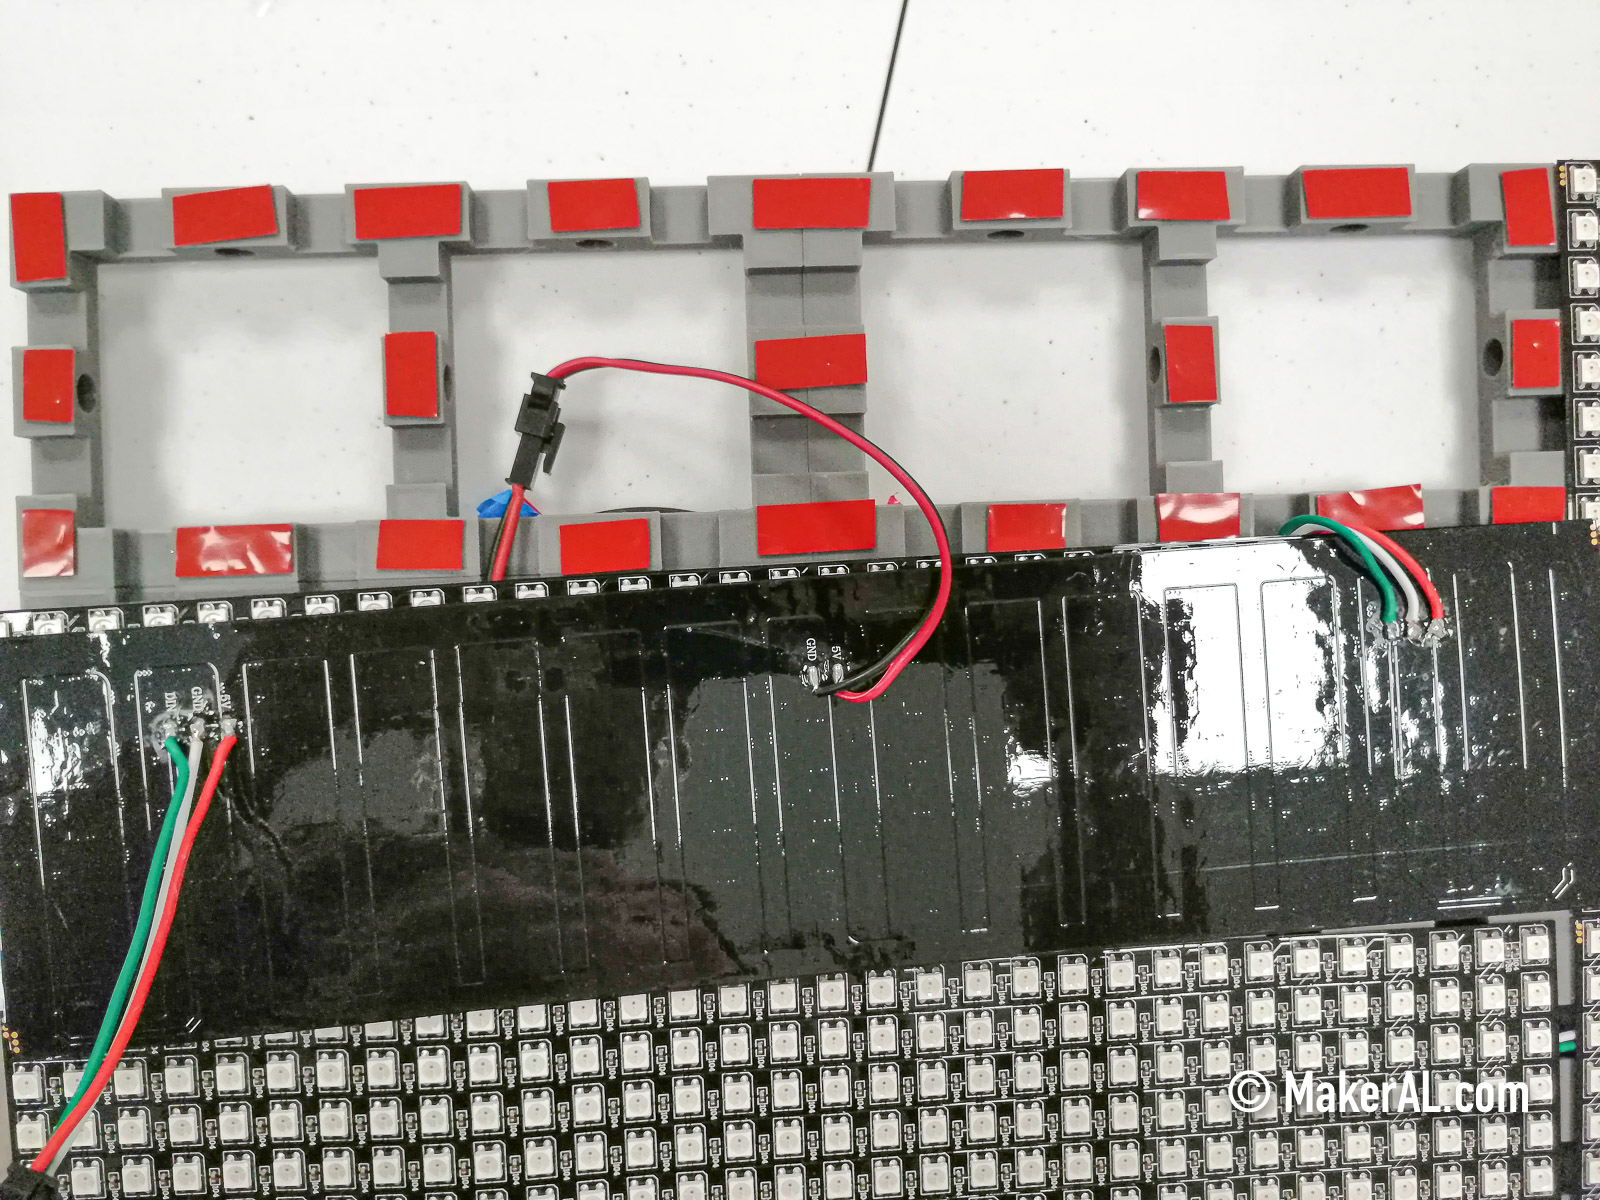
Red and black wires located in the middle of the LED matrix are used to supply additional voltage for daisy chained LED matrices. Due to voltage drop, LED matrices can display uneven brightness, flickering and random colors. Depends on the capacity of your power supply, this power might have to come from a separate power supply.
The Hard Part
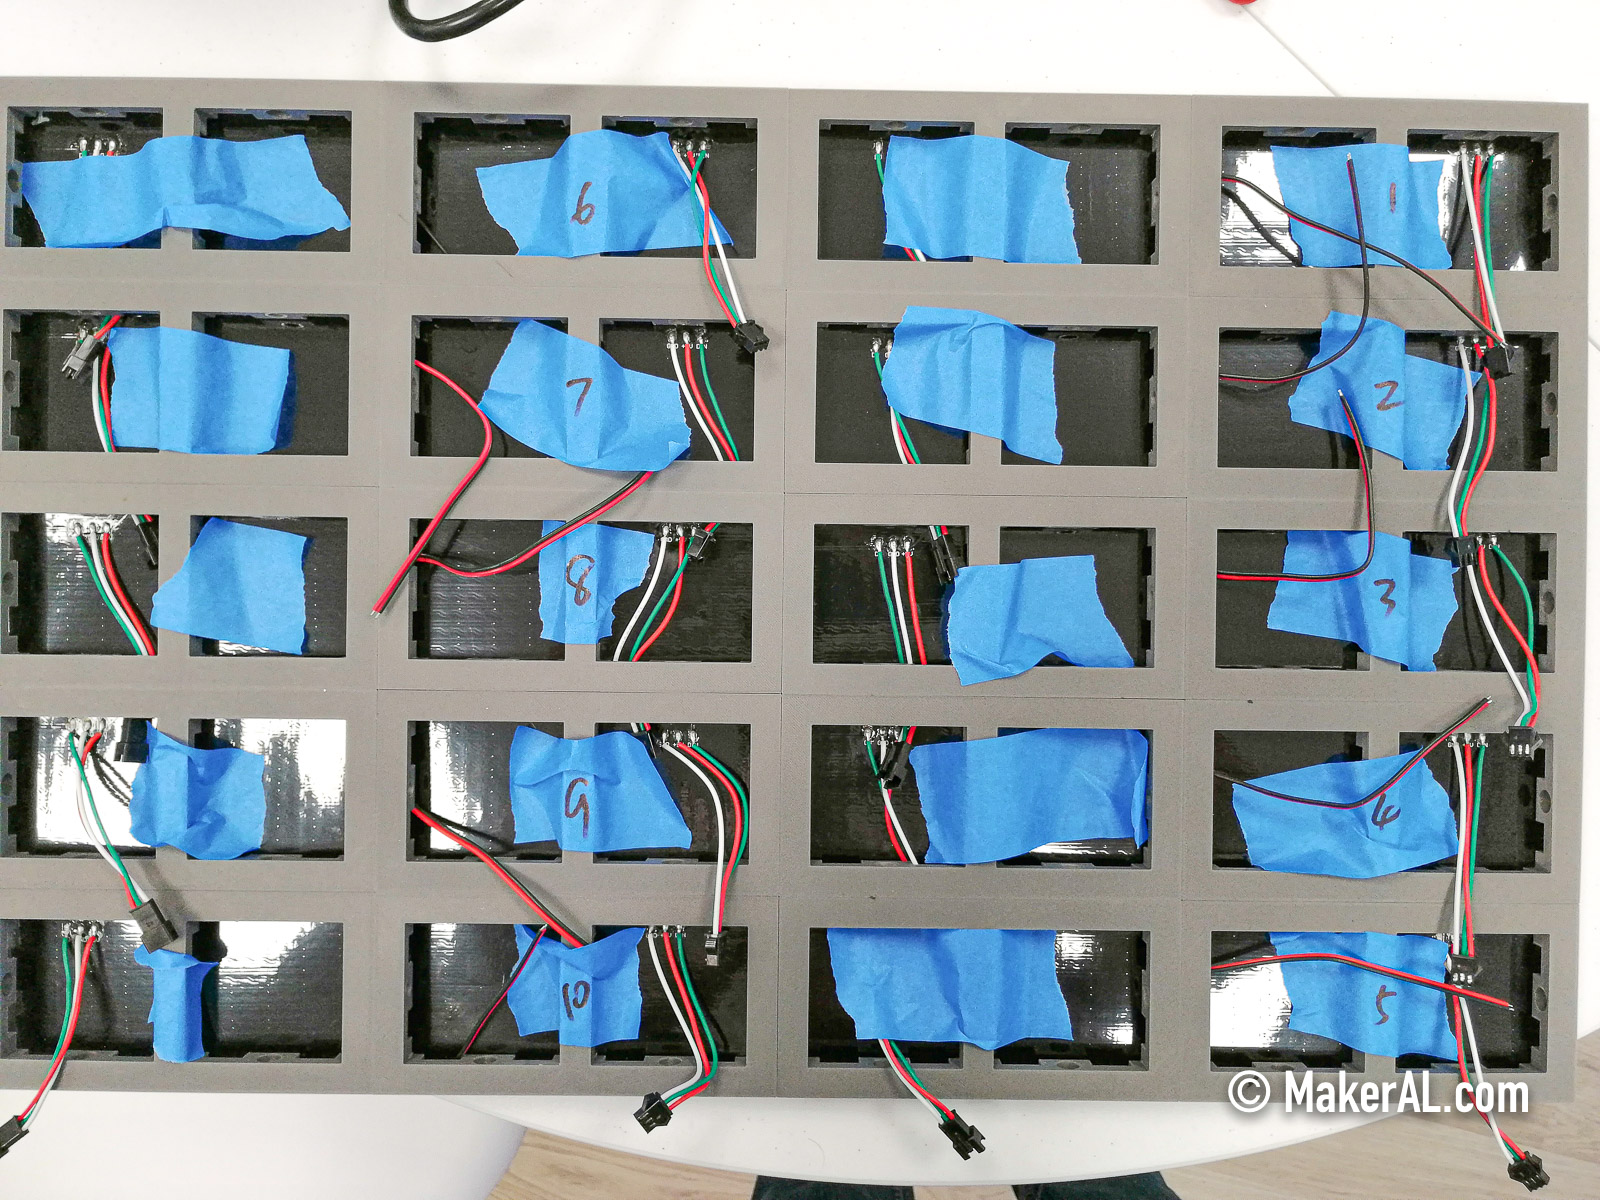
Next, I mounted LED matrices temporarily on the frame with painter's tape. You will see that the first matrix is now located on the top right corner after I flipped the whole panel. I marked each matrix with numbers on painter's tape to avoid confusions.
Now is the time to wire everything together. You must add wire extensions to connect matrices in between rows and columns, because the factory wires soldered on are too short. I chose to add JST connectors to all the wires to make everything maintainable (sorry, but I don't have a picture to show this). You can also unsolder the factory wires and add longer ones.
Don't mount the LED matrices to the frame with double-sided tape yet. Go ahead upload the final code in sections below and test out everything first. Again, it's way easier to fix issue now than after LED matrices are mounted permanently. Well, semi-permanently, with double-sided tape everything is still removeable but it's just going to be a lot harder.
Once everything is working as expected, cut double-sided tape into shorter strips, apply to frame, and peel. Carefully align LED matrix with the bracket and apply it on the tapes. Do this one LED matrix at a time. This will be time consuming. Be patient and pay attention to the wires making sure you channel them through the holes and not getting them trapped on the tapes.
Stock API
I found Twelve Data to be an awesome API provider for real time stock prices. It supports stocks, cryptocurrencies, ETFs, and indices. Their free Basic plan allows for 800 requests per day with maximum 8 requests per minute. With proper throttling, I could get real time prices all day long without exceeding the limit. Each symbol lookup is considered as one request, a batch call of 8 symbols therefore is 8 requests which is also the maximum allowed number of requests per minute. To respect the 800 requests per day limit, I can make one batch call of 8 requests on a 15-minutes interval for a total of 768 requests per day (1,440 mins a day / 15 mins x 8 requests).
I am totally happy with a refresh rate of every 15 minutes. If you want more frequent update of the prices, either reduce the number of symbols or pay for a better plan. I'll leave the math of figuring out
Now go sign up for a Twelve Data account and grab the API key. Read API documentations here.
Coding
Install
Select the correct board under menu
| /** Stock Ticker by MakerAL.com 2021. */ // LED data pin // LED matrix configurations // // Start configs // // WIFI const char* ssid = "your-ssid"; const char* password = "your-password"; // API info const String apiUrl = "https://api.twelvedata.com/quote"; const String apiKey = "your-api-key"; // Stock symbols const String symbols[] = { "SPX", "DJI", "IXIC", "ARKK", "AAPL", "TSLA", "DOGE/USD", "BTC/USD" }; // Ticker interval and duration unsigned long lastTime = 0; unsigned long timerDelayMins = 15; unsigned long tickerDurationSecs = 10; // // End configs // // Colors struct RGB { byte r; byte g; byte b; }; // Define some colors we'll use frequently RGB white = { 255, 255, 255 }; RGB red = { 255, 0, 0 }; RGB yellow = {255, 255, 0}; RGB blue = {0 , 0, 255}; RGB green = {0, 255, 0}; RGB teal = {0, 255, 255}; RGB purple = {255, 0, 255}; RGB off = { 0, 0, 0 }; // // Instantiated matrix // https://learn.adafruit.com/adafruit-neopixel-uberguide/neomatrix-library // Adafruit_NeoMatrix matrix = Adafruit_NeoMatrix( LED_BOARD_WIDTH, LED_BOARD_HEIGHT, LED_TILE_COLUMN, LED_TILE_ROW, LED_PIN, NEO_MATRIX_TOP + NEO_MATRIX_LEFT + NEO_MATRIX_COLUMNS + NEO_MATRIX_ZIGZAG + NEO_TILE_TOP + NEO_TILE_LEFT + NEO_TILE_COLUMNS + NEO_TILE_PROGRESSIVE, NEO_GRB + NEO_KHZ800); // WIFI client WiFiClient client; // HTTP client HTTPClient http; // API results DynamicJsonDocument apiResults(4096); const int symbolLength = ARRAY_SIZE(symbols); void setup() { Serial.begin(115200); // Connect WIFI networkConnect(); // Ignore HTTPS //client->setInsecure(); // Begin matrix matrix.begin(); // Matrix info showMsg("Matrix width: " + String(matrix.width())); showMsg("Matrix height: " + String(matrix.height())); } void loop() { playLed(); // Get stock data every X minutes if (lastTime == 0 || (millis() - lastTime) > (timerDelayMins * 60 * 1000)) { getStocks(); lastTime = millis(); } } void playLed() { // If API results are present // https://arduinojson.org/v6/api/jsondocument/ if (!apiResults.isNull()) { // Go through all symbols with delay for (uint16_t i = 0; i < symbolLength; i++) { const String symbol = symbols[i]; String name = apiResults[symbol]["symbol"]; name.replace("/USD", ""); const float closePrice = apiResults[symbol]["close"]; const float percentChange = apiResults[symbol]["percent_change"]; showMsg(name); showMsg(String(closePrice, 5)); showMsg(String(percentChange, 5)); showMsg("--------"); RGB priceColor = percentChange > 0 ? green : red; String plusSign = percentChange > 0 ? "+" : ""; showStockPrices(name, blue, String(closePrice, 3), white, plusSign + String(percentChange, 3) + "%", priceColor); delay(tickerDurationSecs * 1000); } } } void getStocks() { showMsg("Getting stocks..."); const String stockUrl = apiUrl + "?symbol=" + (implodeString(symbols, String(","))) + "&apikey=" + apiKey; showMsg("Stock URL"); showMsg(stockUrl); // https://arduinojson.org/v6/how-to/use-arduinojson-with-httpclient/ http.useHTTP10(true); if (http.begin(client, stockUrl)) { int code = http.GET(); if (code == HTTP_CODE_OK) { showMsg("Got result:"); //String payload = http.getString(); //showMsg(payload); // https://arduinojson.org/v6/how-to/deserialize-a-very-large-document/ StaticJsonDocument<1024> filter; filter["status"] = true; for (uint16_t i = 0; i < symbolLength; i++) { const String symbol = symbols[i]; filter[symbol]["symbol"] = true; filter[symbol]["close"] = true; filter[symbol]["percent_change"] = true; } // Clear previous results apiResults.clear(); // Populate results here // Use getStream() instead of getString() for memory efficiency, // also apply filter to minimize RAM consumption deserializeJson(apiResults, http.getStream(), DeserializationOption::Filter(filter)); const String status = apiResults["status"]; showMsg("Status:"); showMsg(status); if (status == "error") { showMsg("Unable to read stocks, most likely API request rate has been reached"); // Clear previous results apiResults.clear(); } } // Disconnect http.end(); } else { showMsg("Unable to get stocks, most likely network error"); // Clear previous results apiResults.clear(); } } void showStockPrices(String line1Text, RGB line1Color, String line2Text, RGB line2Color, String line3Text, RGB line3Color) { matrix.fillScreen(matrix.Color(off.r, off.g, off.b)); matrix.setBrightness(LED_BRIGHTNESS); matrix.setTextWrap(false); // Line 1 matrix.setCursor(0, 0); matrix.setTextColor(matrix.Color(line1Color.r, line1Color.g, line1Color.b)); matrix.print(line1Text); // Line 2 matrix.setCursor(0, 8); matrix.setTextColor(matrix.Color(line2Color.r, line2Color.g, line2Color.b)); matrix.print(line2Text); // Line 3 matrix.setCursor(0, 16); matrix.setTextColor(matrix.Color(line3Color.r, line3Color.g, line3Color.b)); matrix.print(line3Text); matrix.show(); } void networkConnect() { WiFi.begin(ssid, password); while (WiFi.status() != WL_CONNECTED) { delay(500); showMsg("*"); } showMsg("You're connected to the network"); printWifiStatus(); } void printWifiStatus() { // Print the SSID of the network you're attached to showMsg("SSID: " + String(WiFi.SSID())); // Print your WiFi shield's IP address IPAddress ip = WiFi.localIP(); showMsg("IP Address: " + ipToString(ip)); // Print the received signal strength long rssi = WiFi.RSSI(); // -60dBm and higher to be considered as good showMsg("Signal strength: " + String(rssi) + "dBm"); } String ipToString(const IPAddress& ipAddress) { return String(ipAddress[0]) + String(".") + \ String(ipAddress[1]) + String(".") + \ String(ipAddress[2]) + String(".") + \ String(ipAddress[3]); } const String implodeString(const String values[], String join) { String string = ""; for (uint16_t i = 0; i < symbolLength; i++) { string += values[i] + join; } return string; } void showMsg(String msg) { Serial.println(msg); } |
Find symbols supported by Twelve Data:
Update variables below and upload code.
-
ssid - your WiFi access point -
password - your WiFi password -
apiKey - your Twelve Data API key -
symbols - an array of symbols -
timerDelayMins - interval to fetch stock data in minutes -
tickerDurationSecs - duration of each symbol on screen in seconds - // WIFI const char* ssid = "your-ssid"; const char* password = "your-password"; // API info const String apiKey = "your-api-key"; // Stock symbols const String symbols[] = { "SPX", "DJI", "IXIC", "ARKK", "AAPL", "TSLA", "DOGE/USD", "BTC/USD" }; // Ticker interval and duration unsigned long timerDelayMins = 15; unsigned long tickerDurationSecs = 10;
- ALWAYS plug in the power supply when the USB cable is also plugged in. You want to avoid power draw from the USB cable because it does not handle large current. Power overload will damage the USB, microcontroller, LED or even the computer. If you need to cut off power during emergency, unplug USB cable first, then the power supply.
-
Finally
Here is the final product. The controller will fit snuggly in the groove of the frame. I also applied hot glue to reinforce the double-sided tape but I found it's to be an overkill.
You can either hang the MakerAL stock ticker or put it on stand. 3D printable stand STL file can be downloaded below. You will need 4 of them and glue them together.
-

Disclaimer
- LEDs will generate heat and possibly consume a lot of power
- Insufficient power or power overload will cause the wires to melt and ignite fire
- LEDs will hurt your eyes and cause health issues
- I will hold no responsibility for any damage. Make at your own risk
-
References
Eric Jones
My name’s Eric and I just found your site btf-lighting.com.
It’s got a lot going for it, but here’s an idea to make it even MORE effective.
Talk With Web Visitor – CLICK HERE https://boostleadgeneration.com for a live demo now.
Talk With Web Visitor is a software widget that’s works on your site, ready to capture any visitor’s Name, Email address and Phone Number. It signals you the moment they let you know they’re interested – so that you can talk to that lead while they’re literally looking over your site.
And once you’ve captured their phone number, with our new SMS Text With Lead feature, you can automatically start a text (SMS) conversation… and if they don’t take you up on your offer then, you can follow up with text messages for new offers, content links, even just “how you doing?” notes to build a relationship.
CLICK HERE https://boostleadgeneration.com to discover what Talk With Web Visitor can do for your business.
The difference between contacting someone within 5 minutes versus a half-hour means you could be converting up to 100X more leads today!
Eric
PS: Studies show that 70% of a site’s visitors disappear and are gone forever after just a moment. Don’t keep losing them.
Talk With Web Visitor offers a FREE 14 days trial – and it even includes International Long Distance Calling.
You have customers waiting to talk with you right now… don’t keep them waiting.
CLICK HERE https://boostleadgeneration.com to try Talk With Web Visitor now.
If you’d like to unsubscribe click here http://boostleadgeneration.com/unsubscribe.aspx?d=btf-lighting.com
Eric Jones
Hey, my name’s Eric and for just a second, imagine this…
- Someone does a search and winds up at btf-lighting.com.
- They hang out for a minute to check it out. “I’m interested… but… maybe…”
- And then they hit the back button and check out the other search results instead.
- Bottom line – you got an eyeball, but nothing else to show for it.
- There they go.
This isn’t really your fault – it happens a LOT – studies show 7 out of 10 visitors to any site disappear without leaving a trace.
But you CAN fix that.
Talk With Web Visitor is a software widget that’s works on your site, ready to capture any visitor’s Name, Email address and Phone Number. It lets you know right then and there – enabling you to call that lead while they’re literally looking over your site.
CLICK HERE https://boostleadgeneration.com to try out a Live Demo with Talk With Web Visitor now to see exactly how it works.
Time is money when it comes to connecting with leads – the difference between contacting someone within 5 minutes versus 30 minutes later can be huge – like 100 times better!
Plus, now that you have their phone number, with our new SMS Text With Lead feature you can automatically start a text (SMS) conversation… so even if you don’t close a deal then, you can follow up with text messages for new offers, content links, even just “how you doing?” notes to build a relationship.
Strong stuff.
CLICK HERE https://boostleadgeneration.com to discover what Talk With Web Visitor can do for your business.
You could be converting up to 100X more leads today!
Eric
PS: Talk With Web Visitor offers a FREE 14 days trial – and it even includes International Long Distance Calling.
You have customers waiting to talk with you right now… don’t keep them waiting.
CLICK HERE https://boostleadgeneration.com to try Talk With Web Visitor now.
If you’d like to unsubscribe click here http://boostleadgeneration.com/unsubscribe.aspx?d=btf-lighting.com
Eric Jones
Hey, this is Eric and I ran across btf-lighting.com a few minutes ago.
Looks great… but now what?
By that I mean, when someone like me finds your website – either through Search or just bouncing around – what happens next? Do you get a lot of leads from your site, or at least enough to make you happy?
Honestly, most business websites fall a bit short when it comes to generating paying customers. Studies show that 70% of a site’s visitors disappear and are gone forever after just a moment.
Here’s an idea…
How about making it really EASY for every visitor who shows up to get a personal phone call you as soon as they hit your site…
You can –
Talk With Web Visitor is a software widget that’s works on your site, ready to capture any visitor’s Name, Email address and Phone Number. It signals you the moment they let you know they’re interested – so that you can talk to that lead while they’re literally looking over your site.
CLICK HERE http://talkwithcustomer.com to try out a Live Demo with Talk With Web Visitor now to see exactly how it works.
You’ll be amazed – the difference between contacting someone within 5 minutes versus a half-hour or more later could increase your results 100-fold.
It gets even better… once you’ve captured their phone number, with our new SMS Text With Lead feature, you can automatically start a text (SMS) conversation.
That way, even if you don’t close a deal right away, you can follow up with text messages for new offers, content links, even just “how you doing?” notes to build a relationship.
Pretty sweet – AND effective.
CLICK HERE http://talkwithcustomer.com to discover what Talk With Web Visitor can do for your business.
You could be converting up to 100X more leads today!
Eric
PS: Talk With Web Visitor offers a FREE 14 days trial – and it even includes International Long Distance Calling.
You have customers waiting to talk with you right now… don’t keep them waiting.
CLICK HERE http://talkwithcustomer.com to try Talk With Web Visitor now.
If you’d like to unsubscribe click here http://talkwithcustomer.com/unsubscribe.aspx?d=btf-lighting.com